How to Draw Lips With Coloured Pencils
UART Tip #05: Drawing a Mouth in Colored Pencil with John Middick
Basic structure of the mouth
If you are a serious student of portraiture drawing, it is a good idea to study the separate anatomical parts of the face as pieces of a puzzle. For this particular tutorial, let's take a look at basic structure of the mouth and how they inform our drawing.
The mouth is not flat, but protrudes slightly from the face. There are some natural shadows that will occur with the contours and shapes that make up the lips. The upper lip will generally be darker than the lower lip because it angles slightly inward (see illustration below). You'll also typically need some shading right below the lower lip before you get to the chin.

At the corners of the mouth there are many connecting muscles. This is often the reason why we see dimples in someone's smile and why we often see a slight bump in the area next to the corners of the mouth.
Difference in men's mouths and women's
There a few key differences to keep in mind when drawing male mouth's as compared to females:
- A male's jawline and lips can always be drawn more angular than that of a female's.
- The distance between the bottom of the nose and the top of the upper lip is a longer distance on a man that it is on a woman.
- You are generally safer in drawing the lips slightly darker on a woman than you are on a man, even if she is not wearing lipstick.
Of course any of these so-called "rules" can the broken if we're trying to render a strict representation of a photo and we're following the rules of light, perspective, color and value in our artwork.
Ready to jump into an actual drawing? Let's do it!
In my drawing demonstration I'll be using UART's 800 grit, Sanded Paper.
The pencils I'll be using are Caran D'Ache Luminance: Anthraquinoid Pink, Crimson Aubergine, Ultramarine Pink, White, Brown Ochre, Brown Ochre 10%, Burnt Ochre, Burnt Ochre 10%, Burnt Sienna, Burnt Sienna 10%, Primrose, Sepia.

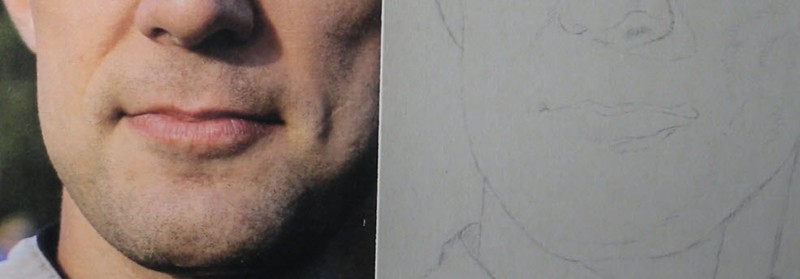
Step 1 – Layout
I took this photo of a man's face in the early morning, and he's looking toward the sunrise. The light source is mostly horizontal, as is evidenced by the shadows. I'll start with a complete line drawing of the full piece rather than just honing in on the mouth. This is important so that the proportions are exactly how I want them before I ever lay down any color.
Step 2 – Initial Shading
Once I have my full line drawing completed, then I'm ready to focus in on the mouth. I start by shading of the lips and the skin around the mouth. I first use Crimson Aubergine for the separation line in the lips and to shade the corner recesses of the mouth, and the bottom part of the lower lip. Next I add Anthraquinoid Pink as another layer, paying close attention to the curvature of the lips.

Step 3 – Adding Lower Lip Shadow
I then add a shadow to the lower lip and a layer of Burnt Ochre to the skin around the lips.

Step 4 – Adding White Highlights
In order for the shading to look more realistic, I add white back to the middle portion of the lower lip for a highlight.

There you have it: four simple steps for drawing a mouth in colored pencil. It may seem tedious to focus so closely on one part of the face, but it will ultimately improve your drawing skills and give your portraits more life.
John Middick
For more tips and techniques in colored pencil, Check out John's website at http://sharpenedartist.com/
How to Draw Lips With Coloured Pencils
Source: https://www.uartpastelpaper.com/uart-tip-of-the-week-drawing-a-mouth-in-colored-pencil-with-john-middick/
0 Response to "How to Draw Lips With Coloured Pencils"
Publicar un comentario